Driving the Sea-to-Sky Highway safely isn’t about being a daredevil; it’s about knowing the specific local rules that separate a dream drive from a travel nightmare.
- Winter tires with the correct symbol and tread depth are a non-negotiable legal requirement from October 1st to April 30th.
- Speeding and illegal stops are met with severe penalties, including vehicle impoundment and hefty fines.
Recommendation: The key to a stress-free journey is preparation. Check your tires, know the speed zones, and plan your return trip from Whistler to avoid the predictable peak Sunday traffic.
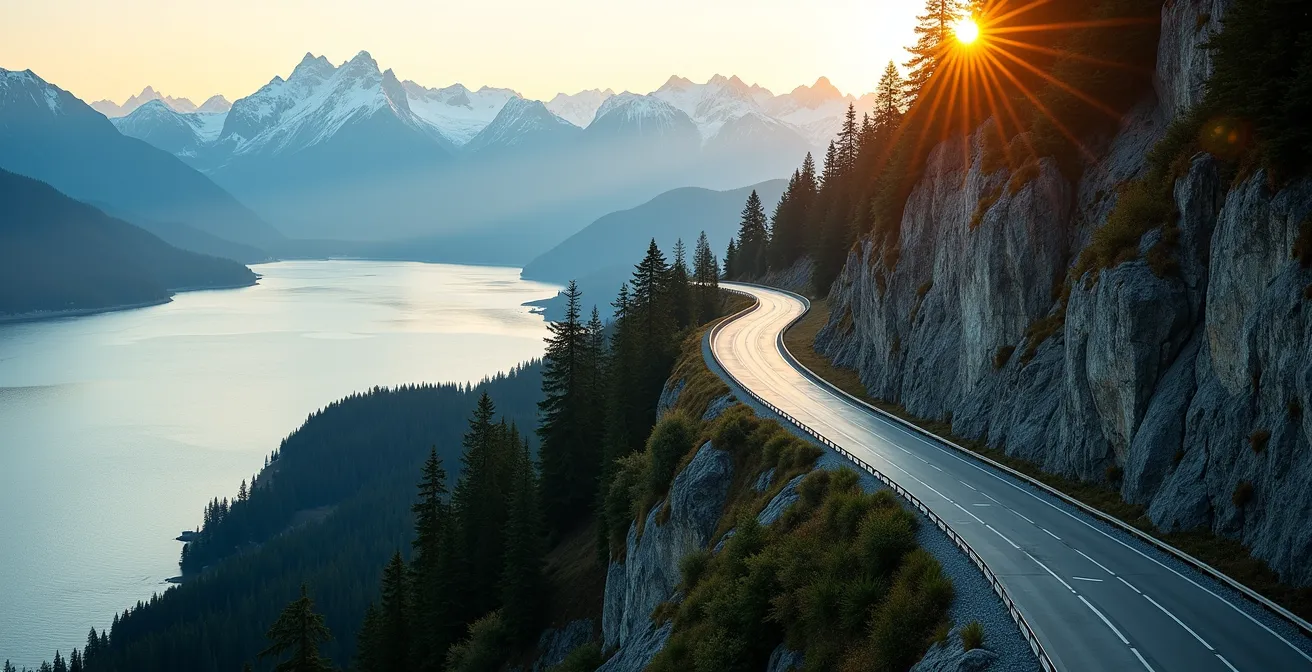
The drive from Vancouver to Whistler on British Columbia’s Highway 99, famously known as the Sea-to-Sky Highway, is one of the most breathtaking road trips on the planet. With the turquoise waters of Howe Sound on one side and the towering, granite faces of the Coast Mountains on the other, it’s a journey that rivals the destination itself. For many tourists, whether chasing summer hikes or winter powder, this drive is a highlight of their trip. But this beauty comes with a responsibility to understand its unique challenges.
Many guides will give you the generic advice: “drive carefully” or “watch for weather.” While true, this doesn’t prepare you for the specific, enforced rules of this particular road. The real key to a safe and enjoyable trip isn’t just cautious driving; it’s possessing insider knowledge. It’s about understanding the nuances of BC’s winter tire laws, the rhythm of the weekend traffic, and the costly consequences of seemingly small infractions. This isn’t just a highway; it’s a dynamic corridor with its own set of rules.
This guide moves beyond the platitudes. Think of it as having a local driving instructor in your passenger seat. We will break down the ‘why’ behind the rules, giving you the compliance confidence to handle the road like a seasoned local. We’ll cover everything from the mandatory equipment you need in winter to the strategies for avoiding traffic jams and the hidden costs of ignoring bylaws in Whistler. By understanding the playbook of the road, you can spend less time worrying and more time soaking in those world-class views.
To help you plan your journey from start to finish, we’ve structured this guide to cover every critical aspect of your drive and stay. From essential vehicle prep to making the most of your time at the destination, here is your complete roadmap.
Summary: Your Complete Guide to the Sea-to-Sky Experience
- Why winter tires are mandatory from October to March on this highway?
- How to access the secret waterfalls near Squamish without a long hike?
- Speeding fines and impoundment risks on the winding sections of Hwy 99
- Sea to Sky Gondola vs. Peak 2 Peak: which view is superior for the price?
- When to drive back to Vancouver to avoid Sunday ski traffic jams?
- How to save 40% on lift tickets at Whistler Blackcomb by booking early?
- Strict noise bylaws in Whistler neighborhoods: how to avoid a $1000 fine?
- Alpine Skiing in Canada: Budgeting for a Slope-Side Vacation
Why winter tires are mandatory from October to March on this highway?
The first and most critical rule for driving the Sea-to-Sky Highway in the colder months is non-negotiable: you must have proper winter tires. This isn’t a suggestion; it’s the law. From October 1st to April 30th, vehicles on Highway 99 must be equipped with tires that carry either the M+S (Mud and Snow) symbol or the more robust 3-peaked mountain/snowflake symbol. The weather on this route can change in an instant, with sunny skies in Vancouver giving way to slush, ice, or heavy snow as you gain elevation towards Whistler. Standard all-season tires harden in the cold, drastically reducing grip and turning your vehicle into a hazard.
The province enforces this rule seriously to prevent accidents and road closures. Police and Commercial Vehicle Safety and Enforcement (CVSE) officers conduct checks, and being non-compliant isn’t worth the risk. According to BC government regulations, drivers can face a $121 fine for non-compliance on designated routes like the Sea-to-Sky. More importantly, a lack of proper tires can invalidate your insurance claim if you’re in an accident. For tourists using rental cars, it’s crucial to book a vehicle with winter tires specifically; it’s often an add-on and not standard equipment.
Beyond the legal requirement, having the right tires provides you with “compliance confidence.” It’s the peace of mind knowing your vehicle is properly equipped to handle sudden weather shifts, allowing you to focus on the road and the scenery, not on whether you’ll make it up the next hill. Ensure your tires have a minimum tread depth of 3.5mm—the “Toonie Test” is a great local trick. Just place a toonie in the tread; if the tread covers the bear’s paws, you’re good to go.
Your Pre-Drive Winter Tire Checklist
- Symbol Verification: Check the sidewall of all four tires. Confirm you see either the M+S symbol or, preferably, the 3-peaked mountain and snowflake symbol.
- Tread Depth Audit: Insert a toonie into your tire tread. If the tread is deep enough to cover the silver portion up to the bear’s paws, your depth (over 3.5mm) is legally sufficient.
- Four-Wheel Confirmation: Visually confirm that all four tires are matching winter-rated tires. Mismatched tires can create dangerously unbalanced traction.
- Date Compliance Check: Confirm your travel dates. The law is in effect from October 1st through April 30th, regardless of the current weather.
- Rental Car Confirmation: If renting, do not assume winter tires are included. Call the rental agency ahead of time to explicitly request and confirm your vehicle will be equipped with them.
How to access the secret waterfalls near Squamish without a long hike?
One of the great joys of the Sea-to-Sky drive is the abundance of natural wonders right off the highway. While many require long hikes, several spectacular waterfalls are surprisingly accessible. However, the key is knowing the difference between a safe, designated viewpoint and a dangerous, illegal roadside trap. Stopping on the narrow shoulder of the highway is strictly forbidden and incredibly risky due to high-speed traffic and limited visibility.
The perfect example of how to do it right is Shannon Falls, located just south of Squamish. As the third-highest waterfall in British Columbia, its 335-metre cascade is a must-see. The access couldn’t be simpler or safer: a well-marked exit leads to a large, dedicated provincial park parking area. From there, a gentle, 10-minute walk on a paved path takes you right to the base of the falls. This setup demonstrates how to enjoy the scenery legally and safely, completely separated from highway traffic.
This principle of using designated pullouts is crucial all along the highway. There are numerous official lookouts, like the Tantalus Lookout, which offer incredible vistas of the mountain range and river valley. These spots are designed with deceleration lanes, ample parking space, and safety barriers.
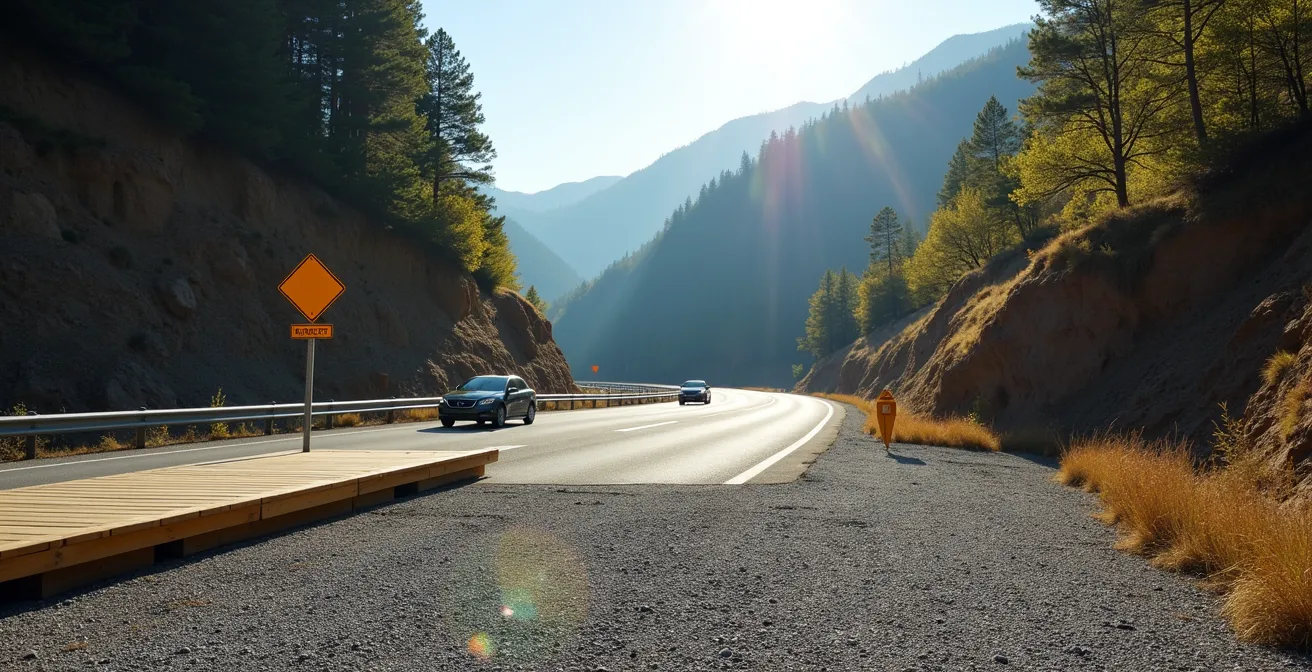
As the image above illustrates, these designated areas provide a safe haven from the flow of traffic, allowing you to stop, stretch your legs, and capture photos without putting yourself or others at risk. Never be tempted to pull over on a grassy or gravel shoulder, no matter how beautiful the view. The safe, official stops are frequent and offer the best, most secure way to experience the highway’s grandeur.
Speeding fines and impoundment risks on the winding sections of Hwy 99
The Sea-to-Sky Highway’s mix of long, straight stretches and tight, winding curves can be deceptive. It’s easy to let your speed creep up, but the consequences of doing so are among the most severe in Canada. British Columbia has a strict Excessive Speeding law, and police actively patrol Highway 99, especially in high-risk zones. This isn’t about a simple speeding ticket; it’s about losing your vehicle.
Driving more than 40 km/h over the posted speed limit is defined as excessive speeding and results in an immediate, roadside 7-day vehicle impoundment. The fines start at $368 and increase dramatically from there. For example, as demonstrated in a recent RCMP case on Highway 99, speeds of 60 km/h or more over the limit can lead to a $483 fine on top of the 7-day vehicle impoundment and associated towing and storage fees. For a tourist, this means your vacation is effectively over, and the costs can easily exceed a thousand dollars. This is the “true cost” of impatience on this road.
To avoid this, you must be hyper-aware of the changing speed limits. The limit fluctuates between 80-100 km/h on open sections and drops to 60 km/h through communities like Lions Bay and Britannia Beach, and on particularly sharp curves. Pay close attention to signage, as these speed reduction zones are often where enforcement is highest.
This table highlights key areas where drivers must be extra vigilant. These are not just suggestions; they are high-enforcement zones where a moment of inattention can have serious consequences.
| Zone | Speed Limit | Enforcement Priority |
|---|---|---|
| Lions Bay curves | 60 km/h | High – blind corners |
| Britannia Beach | 60 km/h | High – residential area |
| Squamish transition | 60-80 km/h | Very High – speed change zone |
| Whistler approach | 80 km/h | High – downhill momentum |
Sea to Sky Gondola vs. Peak 2 Peak: which view is superior for the price?
Two of the most famous gondola experiences in the region are the Sea to Sky Gondola in Squamish and the Peak 2 Peak Gondola in Whistler. For tourists trying to decide where to stop and spend their money, the choice can be confusing. While both offer spectacular views, they serve very different purposes and cater to different itineraries. The “superior” view really depends on your goals for the day.
The Sea to Sky Gondola is best thought of as a premier highway stop. Located just south of Squamish, it’s an ideal 2-3 hour activity on your way to or from Whistler. You don’t need ski gear, and the experience is focused on the breathtaking vista where the ocean of Howe Sound meets the dramatic coastal mountains. At the top, you’ll find the Sky Pilot Suspension Bridge and accessible walking trails. It’s perfect for non-skiers or those on a tighter schedule who want a high-alpine feel without committing a full day.
The Peak 2 Peak Gondola, on the other hand, is an integral part of the Whistler Blackcomb ski experience. It connects the peaks of Whistler and Blackcomb mountains, spanning a massive 4.4-kilometre valley. Its primary function is to allow skiers and snowboarders to access terrain on both mountains in a single day. The views are purely high-alpine, showcasing a seemingly endless sea of snow-covered peaks. Access is typically included with a Whistler Blackcomb lift ticket, making it an essential part of a ski day rather than a standalone attraction.
Here’s a direct comparison to help you choose the right experience for your trip.
| Feature | Sea to Sky Gondola | Peak 2 Peak |
|---|---|---|
| Location | Squamish (en-route) | Whistler (destination) |
| Views | Howe Sound ocean-mountain vista | High alpine peaks |
| Duration needed | 2-3 hours | Full day with skiing |
| Winter access | No ski gear needed | Included with lift ticket |
| Best for | Non-skiers, quick stop | Skiers, alpine hikers |
When to drive back to Vancouver to avoid Sunday ski traffic jams?
Mastering the “rhythm of the road” is never more important than on a Sunday afternoon heading south from Whistler. The mass exodus of weekend warriors creates predictable, and often monumental, traffic jams. The highway’s capacity, even after significant upgrades, can’t handle the sheer volume of everyone leaving at once. This congestion isn’t random; it follows a pattern established years ago. During the 2010 Winter Olympics, the highway underwent major reconstruction, and the traffic flow patterns established then still create today’s predictable Sunday congestion as visitors return to Vancouver simultaneously.
The peak gridlock, known locally as “The Gridlock Zone,” typically builds from 2 PM and can last until 7 PM or later. The main choke points are the traffic light at Function Junction in Whistler, the lane merge from two lanes to one just north of Squamish, and the final approach to Horseshoe Bay. Getting stuck in this can easily add 1-2 hours to your drive.
So, how do you beat it? You have two primary strategies, both centered on “local’s timing”:
- Leave Early: The most effective strategy is to be on the road from Whistler before 11 AM. This puts you well ahead of the main departure wave. You’ll have a clear run through Squamish and be back in the city before the traffic even begins to build.
- Leave Late: The alternative is to wait it out. Enjoy a full day in Whistler, have a leisurely dinner, and hit the road after 8 PM. By then, the bulk of the traffic has dissipated, and the drive is much more relaxed. A popular local tactic is to plan an early dinner stop in Squamish between 4 PM and 7 PM, effectively waiting out the worst of the congestion in comfort rather than in your car.
Remember to check the calendar for BC statutory holidays. On long weekends like Family Day or BC Day, the “Sunday traffic” simply shifts to Monday afternoon, following the exact same pattern. A quick check of the DriveBC website for road conditions before you leave is always a wise final step.
How to save 40% on lift tickets at Whistler Blackcomb by booking early?
The single biggest mistake visitors make when budgeting for a Whistler ski trip is buying lift tickets at the window on the day of. This is by far the most expensive way to access the mountain. With a little bit of advance planning, you can unlock significant savings, sometimes up to 40%, freeing up more of your budget for other parts of your vacation. The key is understanding the different ticket products and their purchase deadlines.
The deepest discounts are reserved for those who commit early. The Epic Pass, which provides multi-day access, offers the most substantial savings but must be purchased by an early December deadline. This is the best option for anyone planning to ski for three or more days. For residents of British Columbia and Washington State, the Edge Card is another fantastic product offering 2, 5, or 10 days of skiing at a heavily discounted rate, but these have a strict fall purchase deadline and are not available once the season starts.
Even if you miss the early bird deadlines, you can still save money. Simply purchasing a single-day ticket online at least 48 hours in advance will yield savings of 15-20% compared to the window price. Many Whistler accommodations also offer ski-and-stay packages that bundle lodging and lift tickets for a reduced rate. Finally, for families, keep an eye out for “Kids Ski Free” promotions, which are often tied to the purchase of an adult multi-day pass during the early booking period.
Essentially, the price you pay is directly related to how far in advance you buy. Walking up to the ticket window is a guaranteed way to pay the maximum price. A small amount of foresight can lead to hundreds of dollars in savings for a family or group.
Strict noise bylaws in Whistler neighborhoods: how to avoid a $1000 fine?
After an exhilarating day on the slopes, it’s natural to want to relax with friends and family in your rental condo or chalet. However, Whistler is not just a resort; it’s a residential community with very strict rules about noise, and tourists are often caught off guard by the severe penalties. The Resort Municipality of Whistler (RMOW) enforces a noise bylaw with zero tolerance, and the consequences fall directly on the renter.
Official quiet hours are in effect from 10 PM to 8 AM every single day. This applies to all properties, including decks, patios, and especially hot tubs. What might seem like normal conversation volume can travel easily in the quiet mountain air, disturbing neighbors who will not hesitate to call bylaw enforcement. If a complaint is made and verified, the property owner is issued a fine. According to Resort Municipality of Whistler bylaws, this often results in a $1,000+ fine being charged back to the renter’s credit card, plus administrative fees. This is a “true cost” that can sour any vacation.
Avoiding this costly mistake is simple if you are aware of the rules and respectful of the community. Here are the essential points to remember:
- Move Indoors: After 10 PM, all conversations and gatherings must be moved inside. This is the most important rule. Voices from a hot tub or deck after this time are the number one cause of complaints.
- Manage Music: If you’re using a hot tub, use headphones for music. Portable speakers, even at low volume, are a common source of noise complaints.
- Review Your Rental Agreement: Most Whistler rental contracts include a specific clause about the noise bylaw. Read it before you arrive so you are fully aware of your obligations.
- The Golden Rule: The simplest test is this: if your neighbours can hear you after 10 PM, you are too loud and risk a fine.
By respecting these simple rules, you ensure a peaceful stay for yourself and the permanent residents who call Whistler home.
Key Takeaways
- Driving the Sea-to-Sky requires specific knowledge of local laws, not just general caution.
- Winter tires are a legal mandate from Oct 1 to Apr 30, and speeding can lead to vehicle impoundment.
- Strategic timing is crucial for avoiding traffic and saving money on activities and accommodations.
Alpine Skiing in Canada: Budgeting for a Slope-Side Vacation
A ski vacation in Whistler is an unforgettable experience, but it can also be an expensive one. A smart budget is the foundation of a great trip, and the biggest lever you can pull is your choice of accommodation. The location you choose will have a ripple effect on your daily costs for food, parking, and transportation. Making an informed decision here is the first step to a financially sound vacation.
The three main options offer a clear trade-off between cost and convenience. Staying in Whistler Village offers the ultimate convenience; you can walk to the lifts, restaurants, and shops. However, this comes at the highest price, with rooms often ranging from $300-$600+ per night, plus mandatory daily parking fees. Creekside, just a few minutes south of the main village, offers a great balance. It has its own gondola for mountain access and accommodation is more reasonably priced, though dining options are fewer. The most budget-friendly option is to stay in Squamish, about a 45-minute drive south. Here, lodging is significantly cheaper, but you must factor in the daily commute on Highway 99, including fuel costs and time.
Here is a breakdown of what to expect for accommodation costs.
| Location | Daily Cost Range | Pros | Cons |
|---|---|---|---|
| Whistler Village | $300-600+ | Car-free, walk to lifts | Highest cost, parking fees $30/day |
| Creekside | $200-400 | Gondola access, good value | Less dining options |
| Squamish | $100-200 | Lowest cost | 45-min daily commute on Hwy 99 |
Beyond lodging, a few local-approved budget hacks can make a huge difference. Take advantage of après-ski happy hour deals (typically 3-5 PM) for what can amount to a large, discounted late lunch. Pack your own pocket snacks and a water bottle to avoid inflated on-mountain food prices. Once you’re in Whistler, use the free village shuttle bus to get around and eliminate parking fees entirely. Finally, consider renting your ski or snowboard equipment in Squamish, where prices can be 30-40% lower than at slope-side shops.
Your journey on the Sea-to-Sky Highway is more than just a drive; it’s the beginning of your adventure. By preparing for its specific demands, you can ensure the entire experience is as spectacular as the scenery. Plan your drive, know the rules, and get ready for an unforgettable Canadian alpine vacation.